
It can be difficult to organize underneath your kitchen sink because you have to deal with the plumbing and disposal underneath it.
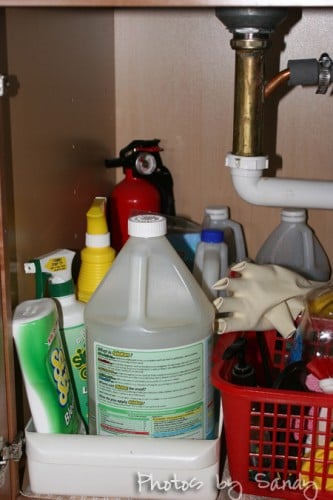
Under The Sink Before:
My previous organizing used some odds and ends baskets. I have an old ice container on the far left. There are several cleaning gloves, cleaners, fire extinguisher, and other odds and ends on this side.
under the sink
On the other side I have the plastic container that is supposed to be hung that holds plastic bags. The wire basket used to hang on the door of another house under the kitchen sink.
I have officially decided I do not like the shelf liners that are not contact paper. I decided to try them for the first time…because that is mainly what I find now and “everyone else is doing it”. lol I have this style and also that bumpy kind of padded open holed shelf liner (do you know what I mean?) It pulls up, I’m constantly trying to smooth it down. Obviously here, you can see how well it looks. Ugh! This is going in the trash.
under the sink
Step 2: Clean the empty cabinet
Clean out your cabinet while you have it empty. I would have liked to have put down contact paper, but I didn’t have any and did not have plans or time to get it today. What is frustrating is that I spent a lot of money on all the shelf liner I bought just a few months ago when I got my new kitchen.
under the sink
Today I will leave it plain, without any liner.
Step 3: Sort through your items and get rid of things you don’t use, that are old or expired or need to go else where
I had two Soft Scrubs and two powdered cleaners. I kept one of each here, and moved the others to one of the bathroom cabinets. I also had a couple odds and ends that I didn’t use anymore that I disposed of.
Step 4: Replace the items that you are going to keep, things you will use.
I ended up going back to Old Time Pottery and buying a couple more of the plastic baskets for my refrigerator. The red ones fit, but they were just big enough that if you didn’t make sure they were pushed all the way back, then the refrigerator door wouldn’t shut. I was just a little concerned about the kids remembering to watch for that, and didn’t think it was worth taking the chance of having spoiled food. So… I had 2 of the large red baskets to play with.
The other red plastic basket did not fit on the other side of the cabinet. It wasn’t too tall to fit under the disposal, but with all the tubing under there, it did not work. I cleaned out the other little red basket that I had been using and used it for the right side.
Step 5: Utilize as much space as you are able.
I could stack baskets or get some kind of wire shelves to make a 2nd level, but I don’t happen to need that kind of space. I do however, have several things that I planned to hang on the doors.
1) My husband isn’t home to hang these items for me
2) When I look at the doors of the cabinets, the items I wanted to hang aren’t going to fit properly. There is a ridge in the inside of the door and the items I wanted to hang aren’t wide enough. ugh!
So…. I needed to think of something else because I was determined to get this completed today!
Here is what I figured out and I am thrilled with it!!
Enter….. Command hooks by 3M (this is not a review for them by the way)
I had a few packs of different sizes of hooks. I used these sticky hooks and hung this wire rack I got at Old Time Pottery.
It worked perfect for the cleaners I use most often in the kitchen.
Be sure that you can close the door with the placement of anything on the door.
I’m really excited that I was able to get this done! If this doesn’t hold, I’ll let you know that you might need stronger hooks.
Now I’m excited to try the other door.
I want to see if these hooks will work to hold up this bag holder.
I was able to mount the bag holder, now to try the wire basket.
That worked also. I put cleaning tools in it. If you knew how excited I was!!
I have one more thing I have to figure out a solution for. I have 2 pair of rubber gloves. I tried just laying them in the basket on the door (no, too bulky). I tried them in the big red plastic basket, but again they just looked junky.
So….. I decided to use the hook solution again. But how I got them to stay up was my new dilemma. But….I came up with an idea that I think will work well for the long run.
Check this out! I used a binder clip to hold the pair of gloves together and then hung that from one of the Command hooks.


Comments