
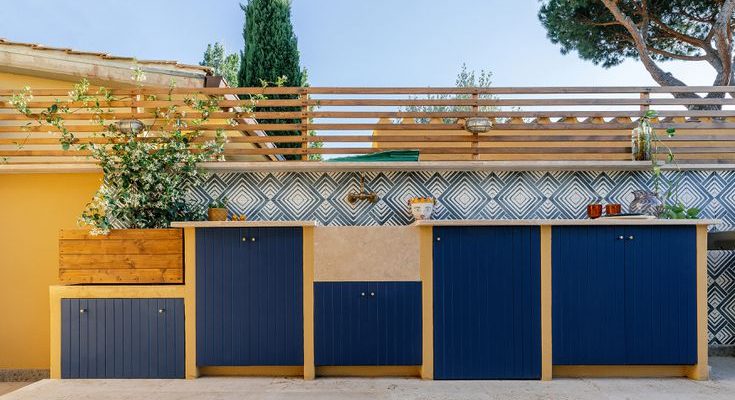
Building an outdoor kitchen is the perfect DIY project for any builder fanatics. If you love up-cycling, creative DIY, or designing your furniture, this is the ideal project for you to complete. Getting hands-on and building something you can get a lot of use out of is super rewarding.
Although, this is not a project for the novice craftsperson. Make sure you consider the time it will take when planning to build an outdoor kitchen on your own and is not as easy as restringing wind chimes. It does take time and perhaps outside professionals to lend a hand. With this detailed guide, you can start the project in no time. It takes around 3-4 days to complete.
Below is the 12-step process that you should follow. Of course, there is room to make tweaks where you wish to so that the design is custom to your likes and needs.
Step #1:
· Use a circular saw to cut the corner posts for each of your boxes. You need to cut eight 2×4 lengths to your desired height. Make sure you take off the thickness of your countertops.
· Use a drill to screw the lengths together.
· At the top and bottom of each post, use the circular saw to cut a notch that is 1½-inch-deep and 3½-inch-high.
· Use stretchers to separate the posts. Then, using your saw, cut four 2x4s matching the required depth of each box. Line them up to the top and bottom and use ties to hold them together.
· Cut another four 2x4s matching the width of the box but take off 3 inches. These should run between the top and bottom posts of both the front and back of the box.
· Once you have decided where you want your cabinets to go, put another 2×4 at the bottom of the framing to provide additional support.
Step #2:
· Use your drill to screw your boxes together, making sure they are side by side. To create feet to support the structure, screw a metal post standoff to the bottom of the frame.
· Plywood panels make a great cover. Cut some plywood apply some adhesive to the posts, and place the plywood down. This can be secured with deck screws.
· Make sure there are openings in the cover for the cabinets. Use the plywood to create boxes that fit the depth of the frame. Use adhesive and deck screws to secure.
· Construct a deep flange around the front of the boxes that measures 1-inch wide and 1¼-inch-deep. Place the boxes to one side until later.
Step #3:
· Builders felt is used to cover the plywood. It fixes easily into place with a staple gun. Overlap the felt until the layer is a couple of inches thick.
· Check which way the honeycombs on the wire lath are facing outwards. If you run your hand over the wire, it should feel like a cheese grater. The wires should be facing up as you lay them down.
· Fix the wire using screws every 6 inches vertically and around 12 inches horizontally.
Step #4:
· Trim along the top and remove any excess lath.
Step #5:
· You will need to use a trowel for this. Mix a bag of mortar and water in a mixing trough using a masonry hoe. You should aim for a peanut butter consistency that doesn’t drop from your trowel if you turn it upside down.
· Lay a scrap board against the bottom edge for protection and use a finishing trowel to spread a layer of mortar in a downwards motion over the lath down to your scrap board. Aim for ½-inch-thickness.
· The mortar should go into all the crevices of the lath. Don’t worry if it moves. Nail it tighter to the lath and carry on.
· You will know when you are finished because there should be no mesh visible. The scratch coat will need to dry for about an hour.
Step #6:
· Check the scratched coat is ready by touching it to see if it is firm. Use your towel to score the surface horizontally.
· Tilt the trowel 45 degrees and start the one side of the island’s short end, positioning the trowel vertically. Go from the short side and round to the front.
· Make sure the lines are as straight and parallel to the ground as you can get them. They are great guides for setting the stone later on.
· Make sure you are scoring the scratch coat in single passes that wrap all the way around and stop when all the motor is grooved.
· Leave it for 24 hours to cure.
· Get the cabinet boxes that you set aside and put them into the openings. Push them back until they meet the mortar at the front of the island. These can be secured to the base using deck screws.
Step #7:
· First, you will need to put your stones into piles that you want to use for the corners, long lengths, short lengths, and rectangular shapes.
· Butter the back of the stoned with mortar that is about 1-inches thick.
· Make sure the excess mortar is removed from the stones. Use your trowel to create v-shaped air pockets.
Step #8:
· Put the stones onto the scratch coat starting from the bottom corner and scrape any excess motor away.
Step #9:
· Lay them out in both directions, overlapping the stones, and mark where they meet.
· Use a diamond blade grinder to shape the stones at the mark so that it forms a tight fit when you place it on the scratch coat.
Step #10:
· Use a miter box to cut away any protruding edges.
Step #11:
· The second course of stones needs to be placed starting from the same corner. Alternate the directions of the corner piece.
· Make sure you use different stone sizes to create a natural look and don’t lay any stones over the flanges.
Step #12:
· Let the stones set for 24 hours and attach them over the flanges.
· Attach the grill and countertops.
Conclusion:
So there you have it, a 12-step guide to installing your outdoor kitchen. Feel free to vary the design and customize it to your likes and needs. Be sure to seek the professional help of a contractor if you get stuck. To give a more personalized touch, you can add bonsai plants.


Comments