
eally am not the queen of office make overs.. lol But I do want to share another one that I helped a client with. I shared with you last week Jerry’s office. This is his wife kathy’s office. She has a small 10×10 office just off their family room.
The Before
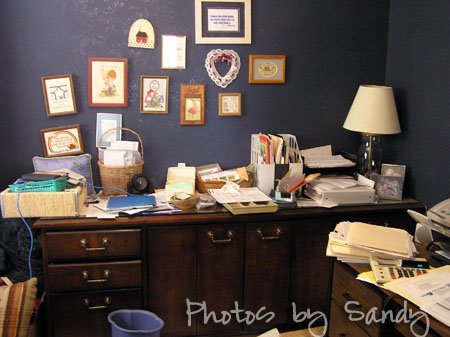
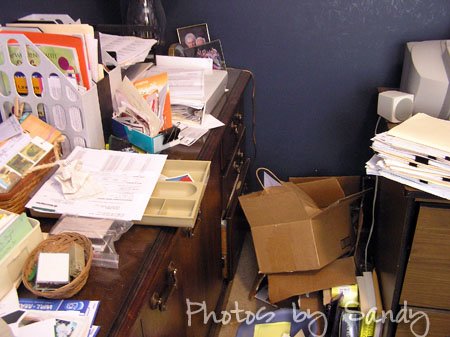
cluttered officeThe really dark blue walls, and heavy furniture made this small office, seem even smaller. All the little pictures made the walls seem too busy cluttered officeThere didn’t seem to be a system. Where did the papers go? cluttered office Without a system, there wasn’t specific places to put things, so things just kept getting piled. cluttered office This area behind the door became a catch all for supplies cluttered office There was hardly any place for her to actually work. cluttered office There was yet another big piece of furniture in front of the window.
What the Client wanted
OLYMPUS DIGITAL CAMERA
My Suggestions
1) Move out the heavy furniture. 2) Paint it a lighter color 3) Sort and declutter 3) Buy or have Jerry build two long desks/tables 4) Put shelves up on the walls above the desks 5) Move the bookshelf to the other wall
They took most all of my suggestions.
1) They wanted the walls to match the living room and so they used the teal and tan paint to match. 2) Kathy and I went shopping for storage containers. Kathy picked out the styles and looks that she wanted for her office. 3) The credenza went upstairs and we used it in Jerry’s office. 4) Jerry built two desks 5) We got shelves for above the desks (I would have liked several more) 6) We went through and decluttered 7) We got a magnetic strip and ribbon organizer for the wrapping station office afterDon’t the desk look great? We made them long enough to go from wall to wall.. so there was plenty of space for working office afterThe basket hanging under the bulletin board was for incoming mail. There were 2 shelves hung and cute boxes and baskets that Kathy picked out were used for storage. We labeled them so she would know what was in them. office afterI personally would have preferred clear containers, but she loved the look of these… and assured me she would know what was in them. lol office afterThis was the gift
OLYMPUS DIGITAL CAMERA
If you’re expert on Home Decor/Home Improvement things & want to get some exposure, Feel free to contribute to home improvement write for us, We’re actively looking for Contributor like You ❤️


Comments