

There’s nothing quite like the satisfaction of looking out over a smooth, green lawn during the summer – especially if you installed the sod yourself! Most lawns eventually need rejuvenation of some kind; if they haven’t been well maintained in the past, they might have to be replaced entirely with sod. Then there are the new homes, office spaces, and so on that need a luxurious turf of grass to go along with the building. Sod is a great option for these spaces as well, since it’s pretty much the fastest and easiest way to get that new lawn going.
Sod installation is definitely easier than growing an entirely new lawn from seeds, but there are also some technical details involved. It’s certainly possible to do it yourself – which is why the tips below could come in handy – but you can also get some experts to do it for you. In some cases, the company that sold the sod could also install it. Or, you could buy sod from one place, and call a separate service for help with installing it.
If you’ve decided to go the DIY route, though, you’re in the right place. Installing sod does take some attention to detail, but it’s definitely possible for anyone who’s willing to spend the time and effort on it.
1: Prepare the soil correctly
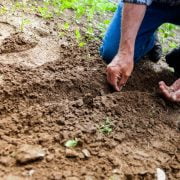
Just like any grass, sod requires the right conditions if you want it to grow. So let’s say you’re planning on installing some sod over a patch of dirt where the rest of the lawn just doesn’t want to spread. Have you figured out why grass doesn’t want to grow there? It’s likely that some type of soil imbalance or deficiency has turned this into an unsuitable spot for growing grass.
The company selling you the sod will usually give recommendations for the soil pH, as well as optimum phosphorous and potassium levels. Make sure you test the soil, and add fertilizers as necessary.
Another aspect of preparing the soil has to do with texture. For example, when you’re putting in a vegetable garden, it’s usually enough to just run a tiller through the soil a couple of times, and trust the tomatoes to grow around the dead weeds, rocks, or lumps of clay. With sod, on the other hand, you aren’t putting in individual plants; you’re laying down a “carpet” of grass that has to mesh with flat, evenly textured soil in order to grow. If there are holes, mounds, rocks or chunks of dirt, clumps of dead weeds, or other obstructions left in the soil, these will prevent sections of the sod from taking root. At best, you could end up with dead spots that will eventually grow over; at worst, the sod would fail to take root, and you’d have to start over.
2: Grade and water shortly before installing the sod
Once you’ve removed obstructions from the soil, it’s important to grade it so that there aren’t any little hills or valleys. Sod isn’t all that flexible when it comes to small differences in the surface, and grading will make it easier for the sod to grip the ground.
Watering is also key – not too much, and not too little. One or two days before the sod is delivered, give the entire area a thorough soak. The goal is to let the water penetrate deep into the soil, which will help it hold onto moisture later during more moderate waterings.
On the day of delivery, give the soil another light watering. This will provide a damp environment for the sod, without turning the soil into a mud puddle.
3: Manage temperatures
There isn’t much you can do to control the weather, but you can manage the temperature of the sod and soil to some extent. Some areas across the US can get quite hot, and if the sod heats up over 130 degrees F, the roots will be damaged. There are a couple of different ways to prevent this.
First, keep the ground moist as you’re laying down the sod; this is a pretty good insurance policy against overheating. Second, don’t leave the sod stacked on the pallets for more than 24 hours. It can survive for a while between harvesting and installation, unless extreme heat is a factor. Even moderately warm temperatures can cause a pallet of sod to heat up to 130 degrees F and beyond given enough time, so keep that in mind as you plan for delivery and installation.
4: Lay the sod properly
Sod installation may seem intuitive, but there are certain techniques that should be used if you want good results. Here’s what the process should look like:
- Sections of sod should be unrolled one at a time, and laid down in a staggered pattern (similar to laying bricks).
- Always start along an edge or border, not from the middle.
- If you’ll be installing on a slope, work from bottom to top.
- Make sure the edges of each section meet tightly, avoiding overlaps.
- Lightly water each section as it’s finished.
5: Take special care of the sod for the first couple of weeks
Getting sod installed can feel like gaining an instant lawn of green grass, but the work isn’t over once the sod has been laid down! The next part of the process is to get the sod to take root in the soil. To encourage this, it’s absolutely essential to water twice per day for the first ten days. An irrigation system is helpful, but some sprinklers will do the job too. If the weather is hot and dry, this is even more important.
After about a week, try checking for new roots – these will be white, in contrast to the brown of the old roots. Within a week or ten days, the new roots should appear. Once this happens, you can gradually slow down the watering schedule to a more normal one.
Installing sod takes some technical expertise, but with the right tips to follow, you’ll have a beautiful new lawn before you know it!


Comments