
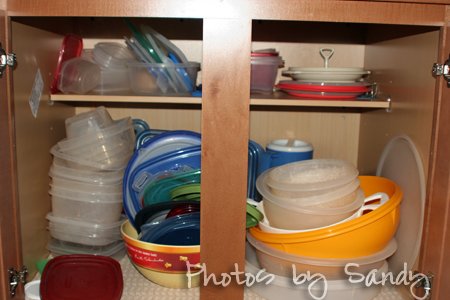
Having to always nest the bowls inside each other to make room… it works but it is hard to get everyone to put those food storage containers back where they have to go. I mean really… actually lean down and pick up a couple bowls to put the larger one underneath? You jest! lol
This is what my “used to be organized” plastic storage containers cabinet looks like now.
Before
The lids are the killers too.. aren’t they? Trying to find a lid to fit that food storage container and best zero turn mower that you use for you big lawn.
So let’s get started.
Step 1: (You know it don’t you) Clean Them All Out of the Cabinet
Clean the cabinet now and if you have contact paper to put down, this is a great time to do it.
Step 2: Sort
Go through and match up all your bowls and lids. Actually try the lids on the bowls because sometimes they warp and don’t work anymore. But what do we usually do when we are looking for a lid? We grab it…. try it… it doesn’t work. Do we toss it then? Nope, we throw it back in (as if it will at some point change and actually start working later?
If there is something you don’t use because you don’t like it – then get rid of it! Why are you keeping it if you don’t use it and you don’t like it? Because it was an impulse buy and you think you might use it? Give it to someone who will use it. You will gain the empty space!
I will bet you that you will end up having odd and end lids and bowls. Here is what I ended up getting rid out of my own food storage cabinet. I’m also getting rid of the bowl because I’ve been using it to store lids, not as a food storage bowl.
mismatched lids
Step 3: Put your organizing tools in place.
You may have to just play around and see how things will work. I had a lid organizer and also grabbed a couple other wire organizers I had to see if they would work or not. Of course this doesn’t see like I would be able to use it does it? It is meant to hang underneath another wire shelf. It won’t hang under a wooden one. But wait…. !
I had this lid organizer from Tupperware that I had never put on a door. I used it, as it also can be free standing – but it was kind of bulky. I used the hooks and it was finally up!
I also had some more of the wire racks that I bought in the bundles at Old Time Pottery. I got out my handy dandy new best friends the Command Hooks to help. I was winging this folks! It can be a trial and error kind of thing.
I put one of them up and realized that the lids were falling through the wire racks. So… I had to figure out something to create a base. I had it!
But after I got it up I realized that there was another issue. The lids could still fall back behind the rack. See that space? So… had to figure out something else.
I needed to make a back shelf too. So…more duct tape!wire shelfIt is a little hard to see but I pulled a piece up higher in the back. It worked!
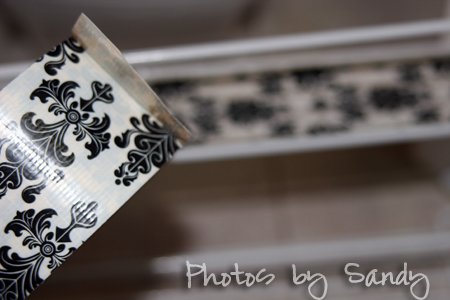
I did this to the three wire racks I was going to hang (although I did run out of duct tape for the last bottom rack, but that was ok.)
Step 4: Load your plastic food storage containers back into the cabinet.
I decided to try and match up the lids and containers since I had more room (with the hanging racks). I didn’t do them all this way, but most all of the smaller ones I did. I love it, like my best above ground pool. It will be so easy to just grab a container now and not have to dig for the lid.
food storage container organization On the left door I loaded the lids of the containers that I didn’t have matched up and put them into the lid organizer from Tupperware.
lid and food storage organization Then on the inside wall I had one more wire rack available, so I put it up too. I actually first put it on the left side and before I did, I held it in place and closed the door and it closed. But loaded, it did not. So I took it down (easy enough with those command hooks) and moved it to the other side. I had to put it in a specific spot in order to close… but it worked out fine.
** Be sure to check that everything will close when you are adding any kind of hanging racks in your cabinets!
food storage container organization This is the one I ran out of duct tape for. I do have lime green and hot pink duct tape… but I thought that might look a bit strange. lol
Here is the rack in the back. With these lids I grouped them together and placed them underneath for easy grab-ability! The things on the bottom I don’t use as often.
food storage organization
I’m amazed at how much extra room I have!
Here is the top shelf. I put the matching lids underneath. Then I had a couple odd ball containers that I nested inside the others and I did put the lids on those.
food storage containers
I placed half of the bowls on the left. The strainer and the two larger bowls. I’m hoping breaking them up will help in being able to put them back away easier.
OMG… I am so excited! Just adding those racks and matching up the lids (and getting rid of a few) it will be SO much easier to find things in here!
This was a very inexpensive fix. (most of mine are). I got the command hooks which I think I paid $6.50 for a pack of 9 of them. (I used 11 in here). I had the back wire rack, but they are not expensive (under $6 I would guess) The lid organizer I don’t remember, it is from Tupperware and I had it from before, but I’m sure there are others similar to it. The other 3 wire racks were in a 3 pack that came from Old Time Pottery. They were $9.99 for the 3 pack. I bought 2 packs when I bought them. I used 2 of the different styles in here, and the 3rd that came with the pack was the one that you could put taller things in like I used under the sink for the spray bottles. The colored duct tape was under $5. But you could modify any of these, and I’m sure find them for less.
Now… I want to see YOUR plastic food storage cabinets!! The good, the bad and the ugly!
I’d love for you to link it up to my Organizing Mission Monday Link Party
It will be open until April 16, 2011. My link party is always open to any of your organizing projects, it doesn’t have to be kitchen!


Comments