

If you desire to keep the part of your house warm during the winters for many more years in the coming future, then a garage heater is a fantastic way to do that.
You can keep your garage heated by saving some amount of money by picking a natural gas heater that you can connect to the gas line of your house.
Well, you will need an expert for the gas heater connection to the gas line; however, you can do venting the garage heater through the wall on your own on any day.
Do you find it frightening? Well, you do not have to worry as it is more straightforward than it seems.
What Are the Major Requirements?
You will get to know two distinct ways to vent a garage heater the right way in this article.
One will explain the venting garage heater through wall and vent mounting, while the other will be performed by hole cutting and installation of the ducts through the garage’s roof.
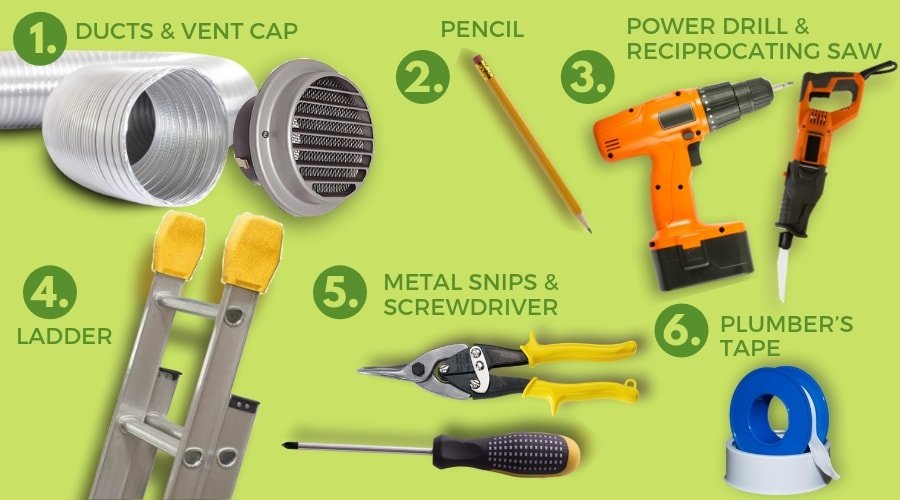
Both the procedures are quite identical to each other; however, you will require some things for them –
- Pencil – You need to make the circles with the pencil that will tell the appropriate cut size.
- Ducts and Vent cap – You need the duct to fit in the header flange. For the venting system’s outer end, you also require a cap.
- Ladder – It is just needed when you desire to vent the heater through holes in the garage’s roof.
- Plumber’s tape – It will give some insulation and be beneficial for ducts’ mounting and holding them in the position.
- Metal Snips and Screwdriver – You need to fix the ducts after their installation with metal snips and screwdriver assistance.
- Power drill and Reciprocating saw – You can create exact holes’ cuts for the venting system with these two materials’ assistance.
Steps to Vent A Garage Heater for Roof Vents
There is no doubt in accepting that an expert exceptionally performs the venting of a garage heater for roof vents. However, it may prove severe for individuals who are low on budget.
Wait, you do not have to worry as the solution is always there. You can create all the connections on your own, and the procedure is not that much complicated as you think.
So, go ahead to check you can operate a garage heater through the roof –
Duct Measurement
You will require a duct that will match the diameter of the heater’s flange so that you will do the appropriate venting of the garage heater.
You will get these dimensions on the actual heater’s packing. However, if you did not get that, you can quickly check this with a measuring tape’s assistance.
You also need to check the duct’s length that you will require for vent making. You can know the separation in the middle of the top where you want the vent to get installed and the heater with the assistance of a measuring tape.
Position Determination
Now, you need to draw the hole’s outline for drilling in the roof. You need to determine how the vent’s connection will be done to the unit and observe the place it reaches in the roof.
- You need to get a duct elbow of 90-degree and position it on the garage heater’s vent flange.
- To point the insertion into the sheathing of the roof, you must make a circle throughout the duct with a pencil’s help.
- You must create a large circle throughout the previous one that needs to be 1-2 inches big. The giant circle implies the clearing you must do for the duct’s insertion into the roof.
Holes Cutting
To create the pilot holes, you must make use of a power drill. Holes need to be approximately ¼ or ½ inches and must be throughout the circle’s perimeter that you made at the previous step.
- Get the reciprocating saw and begin to create the exact cut after you have drilled the holes. You must remove the sheathing of the roof after you performed all the above tasks and then create a position for the duct. You also need to do the remove of the shingles that are positioned throughout the hole.
- Now in the roof flashing, you need to create a hole of the identical diameter.
- Next, you must get the upper flange and position it on the roof’s flashing under the shingles.
External Piece Insertion
When you align the hole in the roof with the one that is in the flashing, you must ensure that the duct is running straight. It would help if you seamed the patches afterward.
You must do the insertion of the duct’s longer part through the hole when you stand under the roof’s hole and ensure that 24 inches of duct are at least there above the roof’s shingles.
Get the vent cap. Position this on the duct’s top end. Get the screwdriver to ensure that the screws are tight enough. You are now done with the outer work; next, you will need to work from the inside.
Middle Piece Securing
You must measure the separation in the middle of the duct part that is now suspended and the 90-degree elbow connected to the heater.
- You need to add 16 more inches to the number that you got after measuring the distance.
- Now, there is a requirement to cut the plumber’s tape. You must tightly cover it throughout the duct after you screw one of the ends on the rafter’s side.
- You need to ensure that the duct’s bottom side is correctly aligned with the elbow that comes out of the garage heater.
- Now you must utilize the deck screw for securing the other tape’s side to the opposite.
Extra Pieces Installation
You can skip this step in the event the duct got suspended from the roof, and there is a connection of the central duct with the elbow.
But there are chances where an extra duct piece is needed for the duct’s connection that gets suspended to the elbow that reaches the heater’s inside.
Elbow Connection
Now, the securing of the elbow must be done to the heater. Make use of 1-inch tapping screws to perform this step.
It would help if you positioned them along the elbow’s rim, and the whole duct system must be completely operational.
Step-By-Step Instructions for Venting Garage Through Wall
To install a vent, it is one among the methods for venting, and it is the venting garage heater through the wall.
Countless numbers individuals select this way over the next one because this will keep the roof intact. It would help if you had all the tools mentioned above for both the ways to vent a garage heater the right way.
Distance Measuring
You need to measure the distance between the middle of the heater and the wall when you go for venting the garage system through the wall.
Individuals usually select the vent installation on the wall that is just behind the heater.
You do not have to forget that the place must focus on the elbow’s top at the wall where you must cut while you position the elbow on the heater’s flange.
Outline Tracing
It would help if you went for drawing the circle that will tell the accurate vent’s diameter. There is also a requirement for another large circle approximately 2 inches wider than the primary one.
You will perform the job of venting the garage heater through the wall with complete clarity if you draw the circles with extreme precision.
Wall Cutting
You can make a clean and nice cut with the assistance of a drywall cutting knife; however, in the event, you have a reciprocating saw, it will also perform the job.
You need to ensure that you do the installation cutting behind the hole that needs to be entirely through the garage’s exterior.
Duct Insertion
You are now prepared with the duct/vent that you have now created, and you can easily do its insertion through the hole.
It would help if you positioned the vent cap on the duct’s outer end. To ensure that no heat escapes the garage, you must do the sealing up of the outer part throughout the duct.
It would help if you kept in mind that you may have to follow some building regulations depending on your place.
You may need to extend the external vent option to inches farther from the wall.
Mounting the Inside Duct System
Well, all other steps are like the ones that are needed for duct installation through the roof.
However, a significant distinction says that you must perform the task horizontally and not vertically. Hence it would help if you asked for some assistance to hold the duct positioned in the exact place while securing it on either end.
By making use of furniture or any other object that will keep the things aligned, you need to support the duct from falling on the ground, or you can ask for anyone’s assistance.
Final Words
Venting garage heaters through walls and roofs is not complicated; however, individuals head to experts as they found holes cutting through the roof a little bit complicated.
Well, you may find it strange first; however, it is just a matter of patience and time and not a difficult task.
You may find that venting the garage heater through the wall is more straightforward than the roof. Well, it is your choice, how do you want to perform the task.


[…] heaters require proper ventilation to ensure safety and optimal performance. This often involves venting the garage heater through the wall, a critical step in the installation process to prevent the accumulation of harmful gases. […]
[…] if you are interested in venting a garage heater through the wall, read this article to get all the information in one […]
[…] you also looking for a way of venting the garage heater through the wall but have had no luck so far? Check out the given link to learn the entire […]
[…] to expand your knowledge? Our previous blog post on venting garage heaters through walls offers a comprehensive look into this […]
[…] have covered more about these blue flames and heaters, venting garage heaters through walls, and other crucial things. So keep reading if you want to know more about the safety and risk […]