
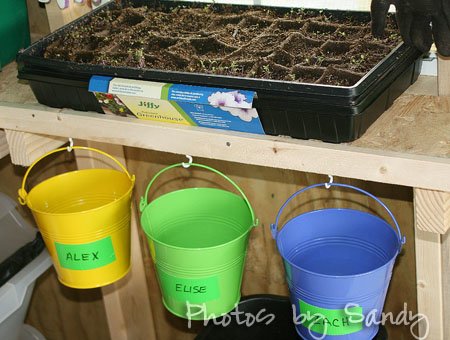
My Garden zone in my shed is the area I like the best. My garden is well made from best zero turn mower.Coming up with storage solutions for the shed was a lot of fun!garden shedDave built the shelf underneath the window specifically to have a place to store the seedlings. This is Elise’s tray of flowers that she plans to plant in the flower box just on the other side of this window. The kids each have their own gardening bucket. No fighting, a specific place to hang them. They are out of the way and add a cute touch.Now you get to see the entire inside of the shed. Here is a picture without any of the bikes. You can see the two shelves on the back wall.Garden & Kid Zones are to the right.
Tool and Fishing Zones are to the left.
I will cover the Tools and loft tomorrow. I was going to add it on today, but there is just too much to go over in the garden zone.You can get a little better view of the garden These are the shelves that Dave built me for gardening supplies.
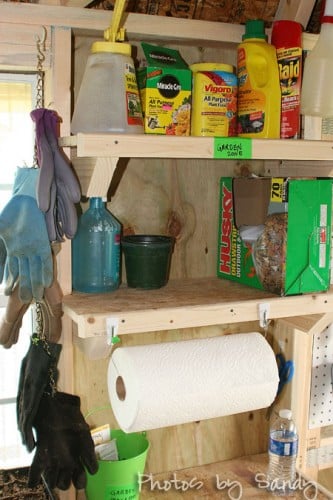
I made this make shift paper towel holder. I didn’t want to go buy one, but I did want some paper towels out here.
paper towel holderI used the 3M Command hooks (again! lol) and they stuck to wood too! So far they seem to be holding great. If I discover different I’ll let you know. But I just put up two command hooks and got some wire. I taped the wire on the left side so that it would stay on.I left the right side with just a wire loop. So that it is no problem to change the roll. No money spent (I already had a pack of the command hooks) and I have a fun little paper towel holder.
I also used a command hook for the scissors I hung in this area. Seems you always need a pair of scissors and I must have used them a half dozen times while I was working in the shed this day.
scissorsThey are hanging just behind the paper towels in the garden area. You can see them if you scroll up a couple pics. One more place I used the Command hooks in this shed is just on the outside of the garden shelf (near the single door) I hung one for my dust pan. I haven’t hung the broom yet, but plan to hang it on one of the shelves above (on the outside like this). The broom I’m using in the shed now does not have a hole in the handle.The shelves are the place for any gardening supplies.
garden shedTo the left of the garden area is the single door. Again there was a lot of space that would have gone un-used if I had not put the pegboard on it. I plan to have Dave put another piece on the lower section, but the only piece we have left is too short to fit.
I had a small basket that I just put a pair of flower snips in. The larger basket underneath the tools has the garden gloves in it.
This was the perfect door for this because it opens up on the side directly across from our three gardens.
Dave put in a third raised garden bed this year so that each of the triplets could be in charge of a garden. He had to put some green fencing around the beds because the dogs thought these were their own sand boxes or something. They kept playing in them. I just saw that the tomato starter tray had fallen when I looked at this picture. That is what that black thing is on the right hand garden bed.
So even if the garden gloves come back looking like this after the kids have worn them – it isn’t a problem. The basket is open, so it helps them dry without getting mildewy and the dirt will eventually come off and fall out of the basket and onto the floor where it will be easy to sweep out the door.
There was an area above this door, well all along the side of the shed that bothered me. I thought there is space up there to be used! Dave again made a little shelf for me (although I didn’t have to have it, but it does keep things more stabilized) to be able to place the more dangerous sprays and chemicals up higher. You can see it in this picture. See above the door?
The roof is slanted and since I didn’t want anyone to get conked on the head coming in or out of the shed by a can of Raid, I made a safety catch. I again used a piece of wire. We put two screws in the studs on either end.
Then wrapped the wire around both ends securely. The sprays and such can just be lift up above the wire to get out or put away. There is no reason to have to take the wire off and on.
You can also see that Dave just used a spare piece of peg board for the shelf. We weren’t able to use this piece anywhere else because it was too small, but it worked perfect here.
Just underneath the garden shelves I bought two rolling plastic bins to store bird feed in. I was thinking one would be for potting soil, but we didn’t have any of that and had lots of bird seed, so at least on this round – both are for seed.
Once one is empty it will be no problem to clean it out and change the label and use it for whatever I need it for.
I Can have a best above ground pool near the shed to enjoy in summer.
garden shed organizationThey are sealed containers so that we don’t attract mice (hopefully)… also why a broom and dust pan are so important. I don’t want to brush the bird seed into the grass. There is some thistle seed in the bird food and if it gets on the grass, I’ll get thistle.
bird food storage
I also think it is important to have a trashcan available in your shed. You will use it more than you would have realized.
garden shed storageTo the left of the garden rolling seat/cart – I have a couple other clear bins. I will use those at this point for potting soil and any odds and ends that might be too big for the shelves. There is some weed control cover in there right now.
The left to the left of the window had a nice space for the watering can.
Her flowers are growing! I do have her take them outside to water them.
flower starters
Here is my little “Martha Touch”. This just seems like something Martha might do. I had all these gardening gloves. Most had never been worn. I decided to use them as a bit of Garden Shed decor! See them? I was having difficulty getting a head on shot of them because it was so light outside. It was washing out the picture too much. But I used a chain and hung them on either side of the window.
garden glove curtainI just thought that was a cute idea. You could actually buy gloves with a pattern and be even more creative with the idea. Hang them down across the top or something?
Dave wanted a clock in the shed, so we brought out one that he had in the basement and didn’t use much. We hung it right over the window. The window still has tape on the outside. Dave still has another coat around the window to paint.On the shelf to the left of the window I have a green bin with sprinklers and garden nozzles in it. One of our coolers is on the shelf above. We have a couple more that might come from the basement out here also.
On the shelf below the paper towels I have another green bucket. I have the seed packs in there that we didn’t use or partially used and a pen and sharpie marker. Just odds n’ endI had a lot of fun with this area.My suggestion is to utilize every portion of your shed you are able.
We will be hanging bikes in the winter, use under shelf space, above head space, door space etc.
I am sure I will continue to add thing up higher on the ceiling and any wall space.Tomorrow I will finish up with the tool area and lofts. I am also hoping to make a video of the whole shed, so you can see it all at once instead of in four different posts

Comments