
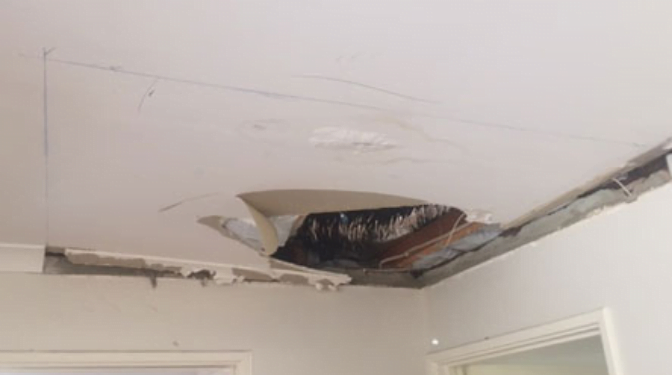
If your ceiling is old with sagging plastic, it is high time that you do something to repair it because it can collapse at any time.
The cracked ceiling could have appeared overnight or gradually crept in. In this article, we will help you with different ways to fix a cracked or sagging ceiling. We will also talk about how to fix a sagging gate.
Why Is Your Ceiling Sagging?
Multiple reasons can cause your ceiling to sag:
The Foundation of Your House
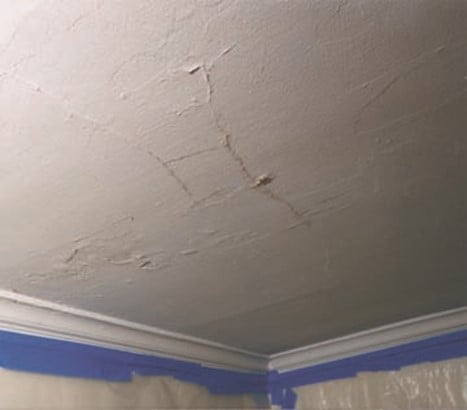
If the land was not graded properly when your house was built or if the foundation was poorly constructed, it can have some drastic effects on your house. This happens because it causes the land to expand or contract, which burdens the foundation. With time, the house’s structure eventually ‘settles in,’ which in turn causes cracks in the ceiling.
Roof Leaks
A leaking roof is hazardous for your ceiling. The weight of water piled onto the ceiling pushes it further and further towards the breaking point. Early signs of a roof leak can be a slow-growing patch of mold or stains on your ceiling.
Termites
If you have a wooden ceiling, Isoptera or termites cause lots of damage to the wooden support beams in the ceiling and throughout the house. Termites are small, white ant-like insects that love eating wood. If you are looking for ways on how to fix a sagging gate, the chances are that your wooden gate was attacked by termites.
Age
The older the building is, the more susceptible it is to ceiling sagging or cracking. The adhesives and fixings holding the building together also get old and begin to fail.
Fixing a Sagging Ceiling
Severe Sagging (Large Patches)
If the ceiling is hanging an inch or more away from the base, then it is severely damaged. In this case, you will have to remove the old plaster and replaster the ceiling. It can also be covered with a wallboard.
Even though it is not an easy task, here are the steps that you should take while fixing large sags:
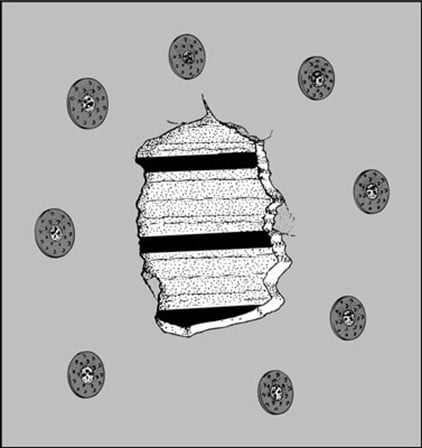
Start by removing the loose plaster carefully. Around the loose area, install drywall screws and plaster washers. Look for a piece of scrap drywall and take out a chunk of dry plaster. It will be better if the shape of the patch is square or rectangle. Place the patch over the hole and mark the outline with a pencil.
Use a straightedge or drywall saw to cut the unnecessary part out. Remove any protruding paper around the patch area. Install wallboard clips on the edges of the damaged wall with the help of screws supplied with the clips. Space the clips not more than 12 inches apart.
Insert the wallboard patch into the hole and drive screws through the wallboard patch into each wallboard repair clip. Cut off the temporary tabs from the repair clips. Apply wallboard tape and compound to the sides of the patch.
After the first coat is dry, apply a second coat. The second application smoothens and conceals the tape. The repair will look obvious if you pile the taping compound in a thick coat over the tape. So, do not do that. Use a sanding block to smooth the area and apply primer and a coat of paint.
Also, if your house has a lower ceiling, you can save time by simply installing another ceiling below the sagged one. This must be done with the help of a professional.
When gates become older, they start dragging on the ground and damage the floor. They also make irritating noise. This is where how to fix a sagging gate becomes a problem. Here are some methods that can help you:
Replacing Hinges
A common answer to fixing a sagging gate is usually the replacement of hinges. Your gate’s operation depends on its hinges. Study the hinges to see if they are bent or damaged. If they are, you can remove the hinges and replace them with new ones.
Start by unscrewing the gate’s hinges from the post until you completely remove the hinge. Once removed, you can unscrew the hinges from the gate itself easily. Then, you can drill new screw holes in the post and the gate and attach the new hinges. This is a DIY task.
Remember that your old hinges could have been too small for the gate, which may cause the sagging motion, so this time you should choose the right hinges.
Replacement of Gate Post
If your hinges are still in good condition, the next step is to examine your gate posts. You may find damage from insects or even rot in the posts. These issues with the wood force the post to loosen in the ground, causing your gate to sag. If this is the case, you will need to replace the post.
Remove the old post. It will be easy if the post is damaged or rotten. Now, dig a new hole. Ensure the new hole has a depth of at least 3 feet. Then, set the new post in concrete, and before the concrete begins to dry, use a level to smoothen the area around the post. Let the post settle for some days before re-installing the gate.


Comments