
Are you someone who loves doing garden chores but does not like spending much on organic and synthetic fertilizers? Then vermicomposting is the perfect alternative for you, my friend.
Worm farming not only helps with the production of organic manure, but it can put your wet waste into something useful and helps you adopt sustainability in your life.
And it can turn out to be a great fun activity for children too. Taking care of worms will make them responsible and teach the importance of sustainability and recycling in a way. And just before you know, they will start developing an interest in gardening, farm duties and connect to nature well.
First, let’s know what exactly worm farming is, and then we’ll move towards its procedure.
What is Worm Farming?
Worm farming is raising worms and using them to decompose kitchen waste. Worms need broken down and rotting food for easy digestion, and kitchen leftovers are the perfect match for them. And the worm feces, also known as vermicast produced by the worms after the digestion process, is used as a high-quality fertilizer. This fertilizer can be used for any plant and works the best.
Things You will Need to Build a Worn Farm
- Two or three plastic bins of the same size. One of them should have a lid with air holes in it.
- Coconut coir
- A large bowl
- Worm blanket. For example, jute or hessian blanket.
- Newspaper
- A drill
- Water
- Worms
- Food scraps
A Guide to Worm Farming
1. Prepare the Containers
Make sure you use containers of the same size. The containers are to be kept on one another, so decide the shape accordingly. You can use 2 or 3 containers according to your convenience.
If you are using two, drill holes at the bottom of one of the containers. And if 3, drill holes in two of them. Place them on one another.
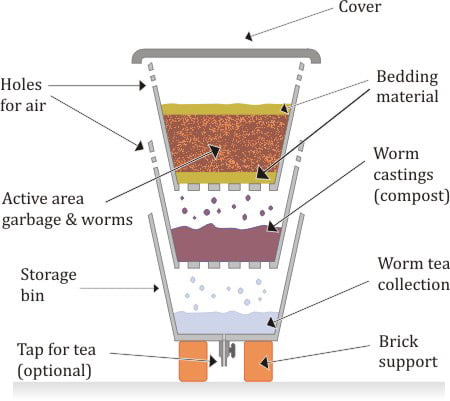
Here is the basic construction of the whole system.
- The first box is the main worm bedding where you put the worms and wet waste. There are holes drilled in this bin. Make sure you put a screen underneath the bedding to prevent worms from falling off the drainage holes.
- The second bin is for collecting the worm castings produced that drips through the drainage holes. This one has a tap inserted in it if you are using a two-bin system. If you are going for the three-bin system, this too has drainage holes in it.
- The third bin is for the collection of worm tea (the liquid form of manure) that drips down and has a tap to collect the liquid fertilizer.
- The whole set-up stands over supporting legs, let us say bricks, for example.
2. Prepare the Worm Bedding
To prepare the worm bedding, you need coconut coir brick or just powdered coconut coir. Coconut coir makes a great choice for worm bedding due to its soft texture; it makes enough room for the worms to move around freely. Make sure it is toxin-free as worms tend to consume their bedding.
If you have coconut coir brick, then take water in a large bowl and let the brick sit inside for 2 to 3 hours. It will expand and get moist. If you find it extremely soaked, you can squeeze it a little bit. Normally, the consistency has to be similar to a wet sponge.
After the coconut coir is expanded, place newspaper over the first bin and level up the coconut coir over it. Put some wet newspaper pieces on top of it.
3. Place the Worms in The Bedding
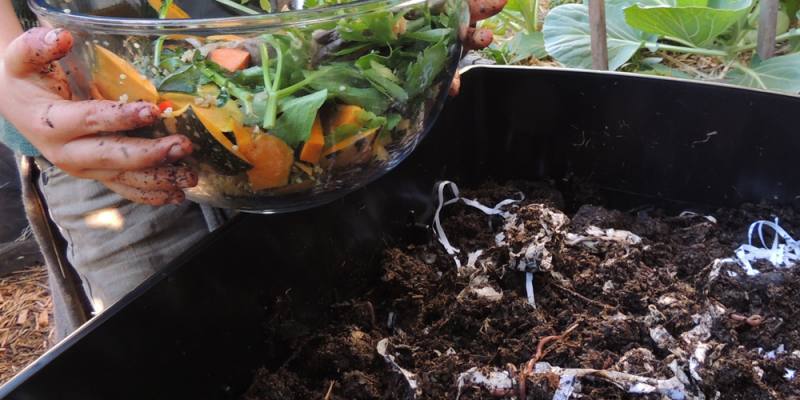
Now, it is time to show the worms their new home. Add the worms carefully. Add them according to container and bedding size, but you don’t need to be concerned about it quite too much. They will make their own space efficiently.
After this step, don’t put food scraps right away; let the worms settle in there for few days, let’s say for about a week. Keep it covered with a warm blanket and put the lid on. The worms will move around and aerate the bedding leading to a better compost formation.
4. Let us Feed the Red Wrigglers
Finally, it is time to make your wriggly friends happy. After the time span of about a week, open the worm farm, dig a shallow layer in the bedding, and put the food scraps inside. Cover it with the warm blanket and put it on the lid.
Now there are certain things to keep in mind while doing so.
5. Amount of Food Scraps You Put In
This has been observed by the gardeners that worms can eat approximately half their total body weight each day. It’s good news for you since you can put your waste to use almost every day. But this doesn’t mean you should pig out your worms. Put in a moderate amount of food according to the number of worms you have.
If you see too many leftover scrapes on the farm almost every day, you know what you are doing wrong. Probably over-feeding your worms.
6. The Way You Add Food Scraps
Along with overfeeding, you should also see that you provide food regularly to the worms and not at once. The worms take time to form worm casting, and they might not end up digesting the entire food right away. If left for a longer amount of time, the food will go sour, leaving a foul odor in the surroundings.
Also, chop the food into small bits to make it easier for your worms to engulf it.
7. What Are You Adding to Your Worm Farm?
Even though worm farming is available for various food waste, there are a few food products that you want to keep away from to avoid the smell and keep your worms healthy.
Here is a list of things you can add:
- Raw as well as cooked leftovers
- Peels and body of vegetables and fruits.
- Teabags
- Paper (in smaller amounts)
- Leftover veggies
Things you need to avoid:
- Dairy
- Processed food
- Bread
- Meat
- raw potato rinds
- Zest of citrus fruits
- Eggshells (grinded eggshells can work)
- Onion
- Garlic
DIY Tower Garden
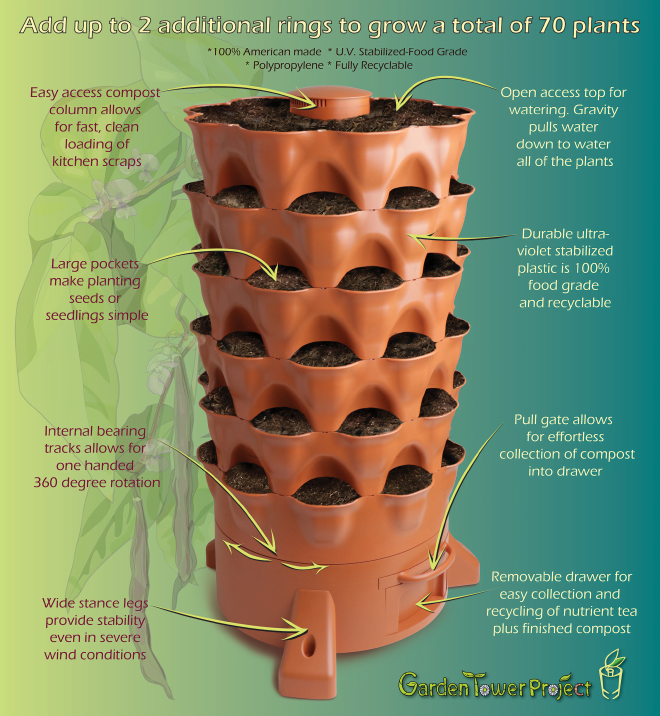
Tower gardens are an excellent alternative to traditional worm farms if you want to grow plants on a smaller scale. It is usually a vertical gardening system with a worm farm in the middle. You can also create your DIY tower garden easily if you don’t want to spend too much on them.
It is an efficient way to grow plants in a vertical system that need not sit in a garden. You can easily place it anywhere, may it be a balcony or any corner of your house.
It typically consists of a large circular container with a specific number of holes in it. A wide pipe which to consists of some holes, is placed in the center of it. The container is filled with bedding, i.e., the soil gradually, and plants are planted along with it through the holes. Worms and kitchen waste is placed in the central pipe and a similar process of worm farming is carried out inside.
To get a brief idea about the tower garden, watch the video given below.
Benefits Of Worm Farming
- Turns waste into something valuable.
- Produces high- quality fertilizer for plants
- The fertilizer produced is all organic, without any harmful and toxic chemicals.
- An excellent engaging activity for children
- Enhances the quality of soil
With a little bit of effort, you can add a high nutritive value to your waste and give your plants the best of manure. Is there anything left? Then what are you waiting for? Get yourself some crawling pets!


Comments