
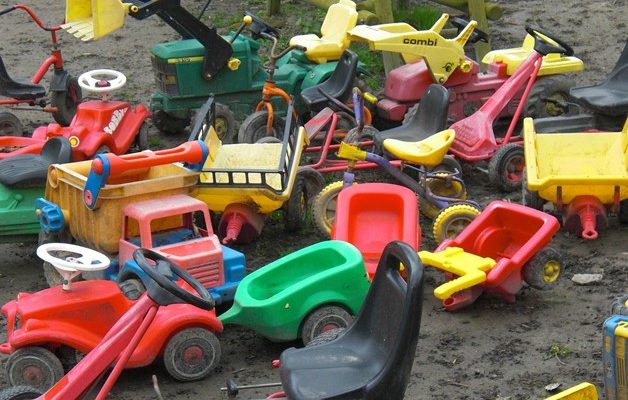
Every parent wants his child to play outside, exercise, and enjoy the tender, carefree years of their childhood. However, outdoor toys scattered over your patios and lawns can be a huge mess and keeps moms shaking their heads in utter dismay as they clear it off. These toys are troublesome in attending guests, and often, your gardening spade gets exchanged with a sand shovel, and spade versus shovel wars rage.
Finding a permanent place for outdoor toys is tough and training children to use the space is even more difficult. The provided solution needs to be a bug and insect-free one and easy to handle and open. Though you can use shelving as a temporary solution, it does not work in the long run and often absorbs toys of their colors in the sun, snow, and rain. You can use a pegboard to hang ropes, buckets, and nets, but hoping that children will sort things the same way, sounds tricky.
Though large shapeless toys can assemble in large buckets, it is problematic for storing buckets. Overflowing buckets are not something you would want your guests to see. Besides, these buckets can fall due to some accidental push, and it will be a task to collect all the toys again. Because of this, and to keep toys safe from breakage, an outdoor toy storage chest sounds like the right option.
Materials
Treated and seasoned plywood acts as the base material. Though it can be hard to work with, it protects from harsh environments and outdoor effects. However, it contains a good amount of moisture, so a proper drying session is necessary before use. You need to align it perfectly for drying to avoid bending. Moreover, circular saws will offer more functionality than regular table saws.
[amazon box=”B07PFHM83H”]The cheapest material alternative is Pine that costs only about $100. You can also opt for Cedarwood that costs about $300 but is not rot-resistant. Alternatively, thermally modified wood, though expensive, can offer chemical-free stability and resistance to decay. So, if bugs and fungi are the problems, naturally dark-stained TMV is the solution.
Tools Required:
- Circular saw / Table saw.
- Clamps
- Drill/drivers
Materials Required:
- 1 – 1/4″ exterior wood screws
- 2″ exterior wood screws
- Treated Pine or preferred wood
- 120 grit sandpaper
- Sander
- Ebony stain / Outdoor clear coat
- Long hinge or hinge supports
- Construction adhesive
- Wood glue
Steps to Build Your Own Outdoor Toy Storage
- Cut all your pieces and work with the front and the back first. Drill all your pilot holes and ensure proper machine settings for the same. Ensure that the holes are on the same side of the boards so that they hide inside. Once you drill the pilot holes, you can flush the top board with scrap pieces as spacers and keep the series going to continue the panel. Alternatively, you can attach scrap corner posts and glue and screw the top to the end.
- Repeat the same procedure with the end boards. Drill pilot holes and screw them to the sides to create a fine-looking toy chest without the top and the bottom.
- Drill pilot holes to prevent splitting and thus attach the bottom slat using a 1″ screw. You can use brad nails to get the bottom slats in place. Alternatively, you can use cleats on the inside edge and slide the bottom slat in place. In addition to wood glue on the cleats, screwing will provide extra stability.
Adding cleats for the bottom
- Use screws to attach the lid, both at the ends and the edges. Keep it compact to avoid water from seeping into the toy chest. Screw it to the shorter boards. Before the installation, lightly sand the lid using sandpaper and cure it of all the roughness.
- Cut a drip groove all along the lid’s perimeter to prevent rainwater from trailing off the top and into the toy store. You may use exterior latex for the outer faces and edges.
- Additionally, you can screw a center frame inside to provide its supply of rigidity and strength. This frame will also diminish the plywood sagging. Apply a little bit of exterior caulk along the top edge to prevent water from entering behind the slat.
- Finally, attach lid-battens to the underside using glue and screws and fasten the lid-battens with longer screws. In return, this will prevent sagging.
- For installing the hinge, you may need extra hands to hold the lid while you screw. Center the hinge barrels about 1/2 inch from the edge and mark the mortise locations, depths equal to the hinge barrels diameter on the lid slat. Use a square cutting blade to cut the mortises. After this, fasten the lid. Alternatively, you can use cheaper supports for the top.
Stained outdoor toy storage unit.
You can now give it a stain of your choice or finish it with a clear coat for completion.


Comments