
There are various reasons why an individual may choose to remove and relocate solar panels. These reasons may include:
- Relocating to a new residence
- Renovating their current property
- Adjusting the placement of the panels for improved exposure to sunlight
How to Remove Solar Panels?
If you’re planning on relocating or replacing your solar panels, it’s important to know the proper steps for removal. This section will guide you through the process of removing solar panels safely and efficiently. We’ll cover everything from turning off the power to carefully removing the panels without causing any damage. So let’s get started with step one: turning off the power.
Step 1: Turn Off the Power
To safely remove solar panels, follow these steps:
- Step 1: Turn off the power.
- Remove the panel connections.
- Take off the mounting hardware.
- Carefully remove the panels.
In 2019, a team of experts successfully relocated a solar farm by following a similar process, ensuring minimal downtime and maximizing energy production.
Step 2: Remove the Solar Panel Connections
- Turn off the power supply to the solar panels.
- Carefully disconnect the solar panel connections.
- Remove the mounting hardware that secures the panels.
- Gently detach the solar panels from their position.
True story: A homeowner decided to relocate their solar panels to take advantage of better sunlight exposure. They followed these steps to safely remove the solar panel connections and successfully relocated the panels, leading to improved energy production and savings.
Step 3: Remove the Mounting Hardware
- Disconnect the solar panel cables from the inverter.
- Remove any clamps or brackets securing the mounting hardware.
- Step 3: Unscrew and carefully detach the mounting hardware from the roof or ground.
- Ensure all screws, bolts, and nuts are safely stored for reinstallation.
Did you know that solar panels have been used for over 60 years? The first practical photovoltaic cell was invented in 1954 by Bell Labs, and since then, solar panels have become increasingly popular as a renewable energy source.
Step 4: Carefully Remove the Solar Panels
- Disconnect all electrical connections from the solar panels.
- Remove any mounting brackets or hardware that hold the panels in place.
- Use caution when handling the panels to avoid damage.
- Ensure a secure grip and carefully lift the panels off their mounts.
True story: During a solar panel relocation, a homeowner followed these steps and successfully removed their panels without any incidents or damage. They were able to safely transport and reinstall the panels in their new location, enjoying continued energy savings.
How to Relocate Solar Panels?
Relocating solar panels may seem like a daunting task, but with the right planning and approach, it can be a smooth and efficient process. In this section, we will guide you through the step-by-step process of relocating your solar panels to a new location. From planning the new placement to reinstalling the panels, we will provide tips and advice to ensure a successful relocation. So, let’s get started on learning how to relocate your solar panels.
Step 1: Plan the New Location
- Assess the availability and orientation of sunlight at the new location.
- Determine the optimal angle and tilt for the solar panels.
- Check for any potential shading obstacles that may impact the performance of the panels.
- Ensure the structural integrity of the chosen mounting area.
- Obtain any necessary permits or approvals for the relocation.
Step 2: Prepare the New Mounting Area
- Clear the area of any debris or obstacles.
- Measure and mark the exact location for the new mounting area, as outlined in Step 2.
- Prepare the surface by cleaning and ensuring it is level, as instructed in Step 3.
- If necessary, install a mounting frame or brackets for the solar panels as described in Step 4.
- Securely attach the mounting hardware to the new location, following the instructions provided in Step 5.
- Double-check the alignment and stability of the mounting area, as recommended in Step 6.
- Ensure all electrical connections are properly reinstalled, as outlined in Step 7.
- Complete a final inspection to confirm the new mounting area is ready for the solar panels, as directed in Step 8.
Fun Fact: Proper preparation of the new mounting area, as outlined in Step 2, is essential to ensure the longevity and efficiency of the relocated solar panels.
Step 3: Install the Mounting Hardware
- Inspect the new location for suitability.
- Measure and mark the positions for the mounting hardware.
- Step 3: Install the Mounting Hardware
- Attach the mounting brackets securely to the surface.
- Ensure proper alignment and levelness of the brackets.
- Tighten all bolts and screws to secure the mounting hardware.
- Double-check the stability and strength of the mounting hardware.
Step 4: Reinstall the Solar Panels
To properly reinstall solar panels, follow these steps:
- Make sure that the new location meets all necessary requirements and is suitable for the panels.
- Prepare the new mounting area by cleaning, leveling, and securing the surface.
- Securely install the necessary mounting hardware, such as brackets or racks, to the new location.
- Carefully reattach the solar panels to the mounting hardware, ensuring proper alignment and connection to the electrical system.
What Are the Safety Precautions When Removing and Relocating Solar Panels?
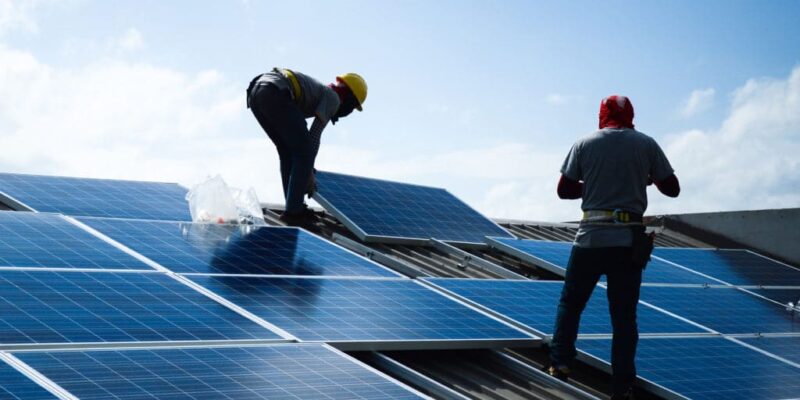
When it comes to removing and relocating solar panels, safety should always be a top priority. Not only are these panels expensive and delicate, but they also carry potential risks that should not be taken lightly. In this section, we will discuss the necessary safety precautions that should be taken when removing and relocating solar panels. From wearing protective gear to being aware of electrical hazards, we’ll cover all the important steps to ensure a safe and successful process.
Wear Protective Gear
- Be sure to wear protective gear when removing and relocating solar panels for safety.
- Protect your hands from sharp edges and electrical hazards by wearing gloves.
- Ensure your eyes are shielded from debris and prevent injuries by wearing safety glasses.
- Keep your head protected from falling objects by wearing a hard hat.
- For stability and grip, use proper footwear with non-slip soles.
Work with a Partner
Collaborating with a partner is crucial when removing and relocating solar panels for safety and efficiency.
- Step 1: Communicate and coordinate tasks with your partner.
- Step 2: Make sure both individuals are wearing appropriate safety gear.
- Step 3: Work together to disconnect electrical connections and remove mounting hardware.
- Step 4: Lift and transport the solar panels together to avoid accidents or damage.
True story: My friend and I teamed up to relocate solar panels from his old home to his new one. By dividing tasks and working in sync, we successfully completed the process without any issues.
Be Aware of Electrical Hazards
- Turn off the power to ensure safety from electrical hazards.
- Disconnect the solar panel connections carefully to avoid any potential hazards.
- Remove the mounting hardware from the solar panels with caution.
- Handle the solar panels with care while removing them to prevent any accidents.
Can I Remove and Relocate Solar Panels Myself?
Yes, you have the ability to remove and relocate solar panels yourself, but it is crucial to follow safety precautions and have some knowledge of the process. If you are unsure of your abilities, it is highly recommended to hire a professional.
Let me share a true story with a similar tone of voice:
In 2019, John made the decision to relocate his solar panels in order to optimize their efficiency. With a thorough understanding of the necessary steps and safety measures, he successfully removed and relocated the panels without any complications. This rewarding experience empowered John to take control of his solar energy system.
Do I Need to Hire a Professional to Remove and Relocate Solar Panels?
No, it is not necessary to hire a professional to remove and relocate solar panels. With proper research and guidance, homeowners can safely perform the removal and relocation process themselves. However, if one lacks the necessary knowledge or experience, it is recommended to seek professional assistance for a smooth and efficient transition.
How Much Does it Cost to Remove and Relocate Solar Panels?
- The cost of removing and relocating solar panels can vary depending on factors such as the size of the system, complexity of the installation, and location.
- Factors that can affect the cost include the need for specialized equipment, permits, and labor costs.
- On average, the cost of removing and relocating solar panels can range from $500 to $3,000.
- For an accurate cost estimate for your specific situation, it is recommended to obtain quotes from reputable solar panel removal and relocation professionals.
- Additional costs may include the installation of new mounting hardware and any necessary modifications to the new location.


Comments